Product Description
Product Description
Coupling Deatails
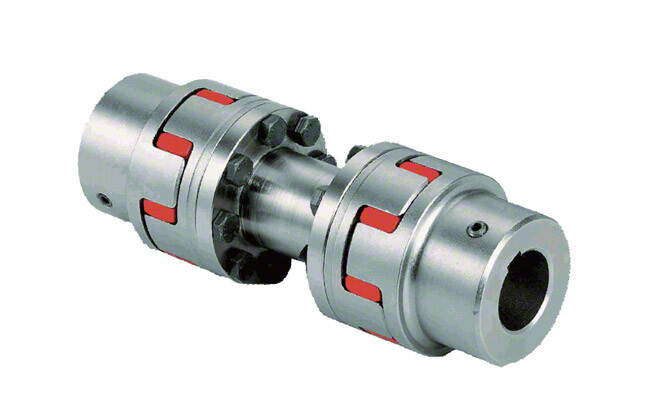
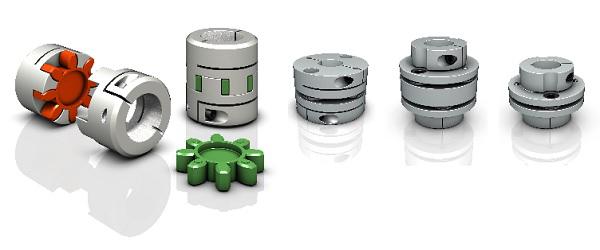
Name: High precision plum blossom
coupling Model: LM-Material: Aviation Aluminum Alloy
Working temperature: -40 ° C ~ 100 ° C
Support customization: Factory direct sales support customization.
Features:
1.Intermediate Elastomer Connection-Absorbs vibration, compensates for radial, angular, and axial 2.misalignment
3.Oil resistance and electrical insulation
4.Clockwise and counterclockwise rotation characteristics are identical-there are 3 different hardness 5.elastomer
6.Fixation by clamping screw.
|
Model parameter |
ΦD |
L |
LF |
LP |
F |
M |
Tightening screw torque |
|
(N.M) |
|||||||
|
GF-14X22 |
14 |
22 |
14.3 |
6.6 |
3.8 |
M 3 |
0.7 |
|
GF-20X25 |
20 |
25 |
16.7 |
8.6 |
4 |
M 3 |
0.7 |
|
GF-20X30 |
20 |
30 |
19.25 |
8.6 |
5.3 |
M 4 |
1.7 |
|
GF-25X30 |
25 |
30 |
20.82 |
11.6 |
5.6 |
M 4 |
1.7 |
|
GF-25X34 |
25 |
34 |
22.82 |
11.6 |
5.6 |
M 4 |
1.7 |
|
GF-30X35 |
30 |
35 |
23 |
11.5 |
5.75 |
M 4 |
1.7 |
|
GF-30X40 |
30 |
40 |
25.6 |
11.5 |
10 |
M 4 |
1.7 |
|
GF-40X50 |
40 |
50 |
32.1 |
14.5 |
10 |
M 5 |
4 |
|
GF-40X55 |
40 |
55 |
34.5 |
14.5 |
10 |
M 5 |
4 |
|
GF-40X66 |
40 |
66 |
40 |
14.5 |
12.75 |
M 5 |
4 |
|
GF-55X49 |
55 |
49 |
32 |
16.1 |
13.5 |
M 6 |
8.4 |
|
GF-55X78 |
55 |
78 |
46.4 |
16.1 |
15.5 |
M 6 |
8.4 |
|
GF-65X80 |
65 |
80 |
48.5 |
17.3 |
18.1 |
M 8 |
10.5 |
|
GF-65X90 |
65 |
90 |
53.5 |
17.3 |
18.1 |
M 8 |
10.5 |
Product Parameters
Detailed Photos
/* January 22, 2571 19:08:37 */!function(){function s(e,r){var a,o={};try{e&&e.split(“,”).forEach(function(e,t){e&&(a=e.match(/(.*?):(.*)$/))&&1
Is It Possible to Replace a Shaft Coupling Without Professional Assistance?
Yes, it is possible to replace a shaft coupling without professional assistance, especially if you have some mechanical knowledge and the necessary tools. However, the ease of replacement can vary depending on the type of coupling and the complexity of the equipment. Here are some general steps to guide you through the process:
1. Safety First:
Before starting any work, ensure that the equipment is turned off and disconnected from the power source. Use appropriate personal protective equipment (PPE) to protect yourself from potential hazards.
2. Assess the Coupling Type:
Different types of couplings may have specific installation and removal methods. Identify the type of coupling you need to replace, and consult the manufacturer’s documentation or online resources for guidance.
3. Gather Tools and Materials:
Collect the necessary tools, such as wrenches, sockets, and a puller (if required), to safely remove the old coupling. Have the new coupling ready for installation, ensuring it matches the specifications of the old one.
4. Disassembly:
If your coupling is a split or clamp-style coupling, you may be able to replace it without fully disassembling the connected equipment. Otherwise, you may need to remove other components to access the coupling.
5. Remove Fasteners:
Loosen and remove any fasteners, such as set screws, that secure the old coupling to the shafts. Take care not to damage the shafts during this process.
6. Extraction:
If the old coupling is tightly fitted on the shafts, you may need to use a coupling puller or other appropriate extraction tools to safely remove it.
7. Clean and Inspect:
After removing the old coupling, clean the shaft ends and inspect them for any signs of damage or wear. Also, check for any misalignment issues that may have contributed to the old coupling’s failure.
8. Install New Coupling:
Follow the manufacturer’s instructions for installing the new coupling. Apply appropriate lubrication and ensure the coupling is correctly aligned with the shafts.
9. Fasten Securely:
Tighten the fasteners to the manufacturer’s recommended torque values to securely attach the new coupling to the shafts.
10. Test Run:
After installation, perform a test run of the equipment to ensure the new coupling operates smoothly and without issues.
While it is possible to replace a shaft coupling without professional assistance, keep in mind that some couplings and equipment may require specialized knowledge and tools for safe and proper replacement. If you are uncertain about the process or encounter any difficulties, it is advisable to seek help from a qualified professional or technician to avoid potential damage to the equipment or injury to yourself.
“`
Can Shaft Couplings Handle Reversing Loads and Shock Loads Effectively?
Yes, shaft couplings are designed to handle both reversing loads and shock loads effectively, but the capability depends on the specific type of coupling and its design.
Reversing Loads:
Many shaft couplings, such as elastomeric couplings, gear couplings, and grid couplings, can handle reversing loads without any issue. Reversing loads occur when the direction of the torque changes periodically, causing the shafts to rotate in opposite directions. The flexibility of elastomeric couplings and the sturdy design of gear and grid couplings allow them to accommodate these reversing loads while maintaining reliable torque transmission.
Shock Loads:
Shock loads are sudden and high-magnitude forces that occur during start-up, sudden stops, or impact events. Shaft couplings with shock-absorbing features, such as elastomeric couplings and grid couplings, excel at handling shock loads. The elastomeric material in elastomeric couplings and the grid element in grid couplings act as shock absorbers, reducing the impact on the connected equipment and minimizing the risk of damage to the coupling itself.
It’s essential to select the appropriate coupling type based on the specific application’s requirements, including the magnitude and frequency of reversing loads and shock loads. Some couplings may have limitations on the amount of shock load they can handle, so it’s crucial to refer to the manufacturer’s specifications and guidelines for proper coupling selection.
In heavy-duty applications with high reversing loads and shock loads, it may be necessary to consider specialized couplings designed explicitly for such conditions, like disc couplings or fluid couplings, which can offer even better performance in handling these challenging load conditions.
“`
Best Practices for Installing a Shaft Coupling for Optimal Performance
Proper installation of a shaft coupling is crucial for ensuring optimal performance and preventing premature wear or failure. Follow these best practices to install a shaft coupling correctly:
1. Shaft Alignment:
Ensure that both the driving and driven shafts are properly aligned before installing the coupling. Misalignment can lead to increased stress on the coupling and other connected components, reducing efficiency and causing premature wear. Use alignment tools, such as dial indicators or laser alignment systems, to achieve accurate shaft alignment.
2. Cleanliness:
Before installation, clean the shaft ends and the coupling bore thoroughly. Remove any dirt, debris, or residue that could interfere with the coupling’s fit or cause misalignment.
3. Lubrication:
Apply the recommended lubricant to the coupling’s contact surfaces, such as the bore and shaft ends. Proper lubrication ensures smooth installation and reduces friction during operation.
4. Correct Fit:
Ensure that the coupling is the correct size and type for the application. Use couplings with the appropriate torque and speed ratings to match the equipment’s requirements.
5. Fastening:
Use the recommended fastening methods, such as set screws or keyways, to securely attach the coupling to the shafts. Make sure the fasteners are tightened to the manufacturer’s specifications to prevent loosening during operation.
6. Spacer or Adapter:
If required, use a spacer or adapter to properly position the coupling on the shafts and maintain the desired distance between the driving and driven components.
7. Avoid Shaft Damage:
Be careful during installation to avoid damaging the shaft ends, especially when using set screws or other fastening methods. Shaft damage can lead to stress concentrations and eventual failure.
8. Check Runout:
After installation, check the coupling’s runout using a dial indicator to ensure that it rotates smoothly and without wobbling. Excessive runout can indicate misalignment or improper fit.
9. Periodic Inspection:
Regularly inspect the coupling and its components for signs of wear, misalignment, or damage. Perform routine maintenance as recommended by the manufacturer to prevent issues from worsening over time.
10. Follow Manufacturer’s Guidelines:
Always follow the manufacturer’s installation instructions and guidelines. Different types of couplings may have specific installation requirements that need to be adhered to for optimal performance and safety.
By following these best practices, you can ensure that your shaft coupling is installed correctly, maximizing its efficiency and reliability in your mechanical power transmission system.
“`

editor by CX 2024-03-27